Specifications
Renew-Crete® Spray Coat is installed as a thin layer of 2-3mm of co-polymer modified resurfacing compound by means of spraying. As in any good concrete resurfacing work, the existing surface is first washed and cleaned with high-pressure water jets to ensure good bonding. Any cracks must be repaired at this time to ensure it does not show through to the new surface.
A base coat is then applied to give a base colour to a patterned spray coat design. If patterns are required, stencils of the desired pattern are laid on the surface before spraying with Renew-Crete® Spray Coat material. If patterns are not required, the Spray Coat material can be sprayed directly on the old surface without the stencils. After the material is dried, it is scraped and the residues are blown off using an air blower. The surface is must then be sealed to protect from daily wear and tear.
Surface Preparation
Outdoors:
It is recommended that the substrate be waterblasted with a min of 3000 PSI.
Oil stained concrete should be cleaned thoroughly by using a pressure washer with a degreaser or stripper if necessary. Etch the surface using 1 part acid to 4 parts water. Neutralise with an ammonia or baking soda and water solution, rinse throughly and allow to dry.
Indoors:
If acid etching is not possible then it is recommended that indoor concrete be shot blasted or mechanically abraded. After the etching, the floor should be washed with a degreaser or detergent and rinsed thoroughly.
Crack Repair
Crack repair is an essential part of a successful resurface application. If proper crack repair is not performed the cracks will transfer into the new surface. Repair all cracks before resurfacing the concrete.
Using a hand grinder with a diamond crack wheel, chase the crack and widen.
Using a straight blade again, chase the crack in the botton of the 'V' shoving the blade as deep as you can to remove any weak areas.
Blow it out and acid etch with a 2-1 acid soultion and rinse thoroughly.
Using a blower and a heat gun, force dry the crack until all water is removed.
Using crack repair epoxy, paint the sides of the crack.
Add clean dry sand to the balance of the epoxy until it thickens, pour it down into the crack and smooth with a putty knife on both sides of the crack.
While the epoxy is still soft trowel in the crack mesh tape and insure that it is covered with epoxy and worked into it well. Make sure that the mesh is completely covered by the epoxy.
While the epoxy is still tacky sprinkle sand over it to give the sproay coat something to grip to.
After the epoxy has dried, blow off the excess sand and use bond coat to make a small batch to trowel down over the repaired crack about 6-8 inches to either side feathering down.
Be sure to allow a min. of 8 hours for the epoxy to dry before feathering out with bond coat.
Mixing Instruction
Using a 20 litre pail, mix 5.7 litres of clean water with 1 bag of spray coat. Mix for 2 minutes using a mixing wand on an electric drill. Consistency should be similar to that of thick gravy. Allow to stand for 5 minutes, remix before application and add a small amount of water to re-temper if necessary. Always add the spray coat bag mix into the water as mixing.
Application Instruction
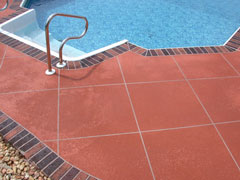
Skim or base coat:
A base or skim coat is used to colour or level your concrete surface prior to applying the finished texture. This coat is applied about 1/16th of an inch thick either with a squeegee or a steel trowel.
This coat should be applied over a damp (no standing water) surface to slow the set slightly.
Allow this application to dry before proceeding. Remove any trowel or squeegee marks by lightly sliding a floor scraper over the surface. Sweep off debris.
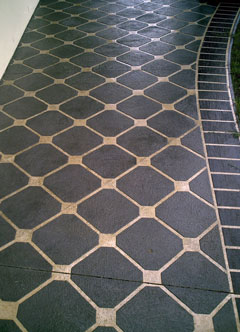
Patterns: taping and stencils
Taping: Commonly strapping tape is used to create most large tile and stone patterns as well as boarders. The tape should be applied to a dry base coat or clean concrete surface. Apply all the tape in one direction first, then follow with the cross direction. Apply the texture and remove tape when material is dry.
Stencils: There are 2 common types of stencils, paper and sticky backed paper, both are disposable. They are available in a variety of brick, stone and tile patterns. Align your stencils and apply texture by shooting straight down, when dry remove stencils.
Textured applications:
The textured surface is applied or shot with a hopper gun. Most models have 3 or more interchangeable tips. These are used to achieve different textures, the smaller the tip, the finer the spray. The fine spray is for colour coverage and is the larger spray is for heavy texture.
The air pressure required will be between 15-30 PSI. Shoot the material downward in a circular motion slightly overlapping with each pass the previous area sprayed. Wearing spiked shoes walk over the freshly shot area and lightly trowel with a pool trowel. Trowel in one direction with an arcched type sweep. Only apply enough texture material that can be troweled before it sets up. When the area is completely textured check for any light or inconsistent areas and re-textue if needed.
Once the material is dry, remove the tape or stencils. Lightly scrape in a diagonal direction to the pattern lines. Sweep of debris.
Coverage
20.4 kg unit covers 14 - 23 square meters.
Curing Time
Minimum curing time is 4 hours.